Showing posts with label ZIA. Show all posts

Saturday, August 10, 2019

Pyrography: Using the Zentangle® method with other mediums

I enjoy tangling and I also enjoy trying new ways to use them.  I have experimented mostly with adding color and pyrography. I enjoy the latter but it is more of a challenge and takes more time to complete the work.  Recently, in preparation for an event, I have done a few more wood cuffs.  All the ones that I have done before have been grid tangles or variations of them.  I had wanted to try more organic tangles but was more apprehensive about it.  Was difficult to get away from that inner critic that would whisper, "what if you make a mistake?". It was not that I was uncomfortable with the tangle but using the burning pen is a lot different than using a Micron. To borrow a phrase from a well known athletic apparel firm, I had to tell my self just do it. Here is the result.


It is not the easiest piece to photograph.  I was pleased with the results.  I used the smallest pen I had which really did help with the control of the curves.  The shading is done with a shading tool.  I do not know that this tangle has a name. It is just one that I have come up with as a way to draw a flower. Sandy Stein Bartholomew I think has a similar one in one of her books. I do not think she named them either.  I think she referred to them as embellishments. 

I have a number of  these cuffs so hope I can get some more done. I also have some basswood plaques that I have not decided exactly what I want to do with them.  This gives me some flexibility, and confidence as will probably do some organic tangles with a phrase of something. Lettering is still something that I am working on.

Thanks for visiting.  As always, comments are welcomed, encouraged and appreciated.

Go Tangle !!

Saturday, July 27, 2019

Getting things ready for a show: Framed ZIAs

There are two shows coming up that I am planning on entering some pieces.  Not sure if I will enter the same pieces in each show or not. One is a show that is a general show and there will be judging.  The other is a show that is having an exhibition on Zentangle® art.  There will be no judging of this.  The show is organized by a lady that took a class from me a number of years ago.  She is a retired art teacher and had been doing pattern drawing with her elementary students for years.  She was intrigued that someone had come up with a way to teach it.  When she came to the class she wore a cap that she had tangled on.  Her goal is to introduce different art forms to people.  Besides having a few pieces in this part of the show, I will be at the show one day and be demonstrating it.  Not sure what all I will do but may have some 2x2 tiles with gel pens available to let people try a few things.  Here are two of the newer pieces I have had framed that will be entered in either one or both of the shows.


Is a little hard to tell from the picture but the frame for the tip picture is similar to a shadow box.  It is not real deep. 


Thanks for visiting.  As always, comments are welcomed, encouraged and appreciated.

Go Tangle !!

Back after a lengthy hiatus: Some things that have been working on.

It has been quite some time since I have posted anything.  Life sometimes has a way of forcing you to deal with things.  Besides dealing with the death of a sibling also rotator cuff surgery and the rehab for that and working full time. The rehab will go on for a while but am doing well with it.  Just working on the range of motion behind my back now, and strength. Hopefully I will not be AWOL for a while.

I did get some things entered in our local art show this year.  received 2nd and 3rd place ribbons for my Paradox Turtle and Whale Tail. Sure that I posted pictures of these earlier but here they are again so you won't have to scroll through old posts.


I have continued to do some wood burning.  Would like to do a little more. Have done some as pendants an others as key fobs.  Here is one the is a pendant.  I have also done a few more crosses. Here are some examples of those.  Some have probably been posted before.  


Don't have pictures of some of the rectangle key fobs that have done, but you get the idea.


Most of my time recently was on preparing things for a class.  Have a group of ladies that have taken a number of classes from me and am always looking for new things to do.  Wanted to do some things with string theory so began looking at different ways to do strings. Was looking for some color.  Borrowed some things from my days in elementary school as well as from some of the postings on acrylic pours.  I used string and acrylic paint in different ways. On some I put the paint on the string and on others I put the paint on the paper.  Here are some of the examples where I put the paint on the string. 


These were both done on 9 x 12 paper.  I had the paint in a small paint bowl that I picked up at Hobby Lobby.  Cut a long length of string and put in the paint. I did not thin the paint but this is something that could do.  On the second one it was still one string, but I had two bowls next to each other and put part of the string in each bowl.  After folding the paper in half, I unfolded it and randomly put the string on half of the paper.  I left two ends sticking out on different sides, refolded the paper and alternately pulled the strings until it was all out.  On the top one I used a piece of cardboard from an old sketch pad to press down on the paper as I pulled the strings. Think that is why there is so much coverage.  On the second one I just used my hand. 

One the next one I did similar process but instead of putting the paint on the string, I put it on the paper.  Here is the end result and I will explain the process after the picture.


There are separate pictures as I cut the paper apart before I took the picture.  On these I drizzled the paint on the paper directly from the squeeze bottle that they were in. I only put paint on half of the paper. It was the same size as the other.  before refolding I randomly placed string on the side with the paint and after refolding it, alternately pulled the string until it was all out.  

The last one I only used half of the sheet so is  9 x 6.  Here is how that turned out. 


The process on this was a little different. I again drizzled the paint on the paper.  Instead of using a long length of string, I used a shorter one.  I used a method that I had seen someone use on an acrylic pour to spread the paint.  I used my thumb to place one end of the string on the paper.  This became a pivot point and I moved a length of the string over the paint. I did not thin the paint but even if I had, need to watch how much paint is building up on the string and if it is too much, you just raise the string a little.  This created a little more texture but I also used a braided string. As you can see I did not spread the paint all over. You could.  As I was experimenting for a class I did not.  The advantage of this method is that you can see what is occurring and you can either change what you do with the string or add a little more paint.  This is the only one that I used white and I did add a little more in a few spots. 

Couple of things that I should mention.  Pulling the strings out can get messy so put down newspaper of a drop cloth under you paper so you do not have a lot of paint to clean off your table. You can also wear disposable latex gloves so it helps with clean up.  With the first two methods you are not sure what you are going to end up with.  I was not sure what I was going to tangle on them.  I started out just putting Tipple in some of the negative space. I stopped and kept looking at it and it finally apparent to me.  Of course now I cannot unsee it.  I have only had a chance to work on one. but here is what I did with the yellow one.


I am not aware of anyway I could have planned this.  It was a happy occurrence. Kind of reinforces the Zentangle® tenet that there are no mistakes just unplanned opportunities.  

If you got all the way through this lengthy post, I appreciate it.  Don't think that posts in the future will be this long. Unless I have another long AWOL, then it could happen.

Thanks for visiting.  As always, comments are welcomed, encouraged, and appreciated.

Go Tangle !! 

Sunday, March 31, 2019

Exploring different styles: Steampunk tangles - a whimsical tile

Life has a way of jumping up and getting your attention. That last two weeks  have been a good example of that for me.  I was struggling with a shoulder injury which unfortunately ended up  being a torn rotator cuff.  Was painful and interfering with sleep enough that decided to get it repaired.  Scheduled the surgery and began working out things to deal with the immediate issues of the recovery.  Could  not stay alone.  That was coming together and I even had a class planned 2 days before the surgery as it is on my dominant side and knew would not be doing much tangling for a while.  That is a part of this post as the tile was to demonstrate a  different way do a tile.  The real kicker came when abut a week before the surgery I got a call that my younger sister had unexpectly died.  that was enough of a shock but got thrown into having to deal with a lo as she was single s next of kin was our Mother, which I have POA for.  Thus, handling things fell on me.  My older sister has helped tremendously with this. But even with her help exhausted doesn't adequately describe how I am feeling most of the time.

As a result of the surgery, have not done much tangling. Could do some non-dominant hand tangling but have to do so much writing with my left hand the effort is more draining.  Miss not being able to tangle.  This is the last tile I did.  Is more whimsical.  Is a vehicle with some character at the helm.  Hope you like it.


Tangles used: Tailpipe, Huggins, Whirly Bird, Chalice, Lifter, Wingnut, Smoke Stax, Sphere Gear, Boilerplate, Steel,and Tipple. Tangles were deconstructed by Alice Hendon, Sandra Strait, and Christine Reyes.  

Thanks for visiting.  As always comments are welcomed, encouraged, and appreciated

Go Tangle !! 

Friday, February 8, 2019

Preparation for classes: Ratoon and Embedded Letters

This will be a short post.  I have been working on some tiles for a class that is coming up in a couple of weeks.  Both of these are my first attempts.  We will be working on Ratoon and Embedded letters.  We will also be working on Steam Punk Tangles.  I have not done any of those yet. Here is what I have done.


The Embedded Letters were fun to do.  I have not done Quandary for quite a while. Think I will do it a little more often. 

Thanks for visiting.  As always, comments are welcomed, encouraged, and appreciated.

Go Tangle !!

Wednesday, January 2, 2019

More traditional Zentangle® art: Dingbatz and Dingsplatz

Have not done a lot of traditional tangling lately.  By this I mean a 3.5" square tile using only a black Micron and a graphite pencil.  Part of the reason for this is that every November and December I participate in a Winter Market. Keeps me busy trying to have some inventory and being at the event.  I have a class coming up in January and wanted to do something other than a project.  Decided to do a class on two techniques put out by HQ, Dingbatz and Dingsplatz.  I had seen them before but never tried them myself.  Came up with a few things before I put them on tiles.  Here are my first attempts on Dingbatz that I did in my journal.


This is the first one that I did.  It is small. A later picture will give you an indication of  its size.


This is the second one,  You can see the other next to it. It is closer to the size of a Zentangle® tile.


This gives you a little better idea of how the two compare.


I then switched to tiles so I can use them for prompts in the class and also to promote the class.  Here are the two tiles that I created.


The dingbatz is on top.  They are fun to do, especially if you like filling in all the spaces.  I have seen some that have more negative space.  May try that in the future.  Shading on these really makes a difference.


Thanks for visiting.  As always, comments are welcomed, encouraged, and appreciated.


Go Tangle !!

Monday, November 19, 2018

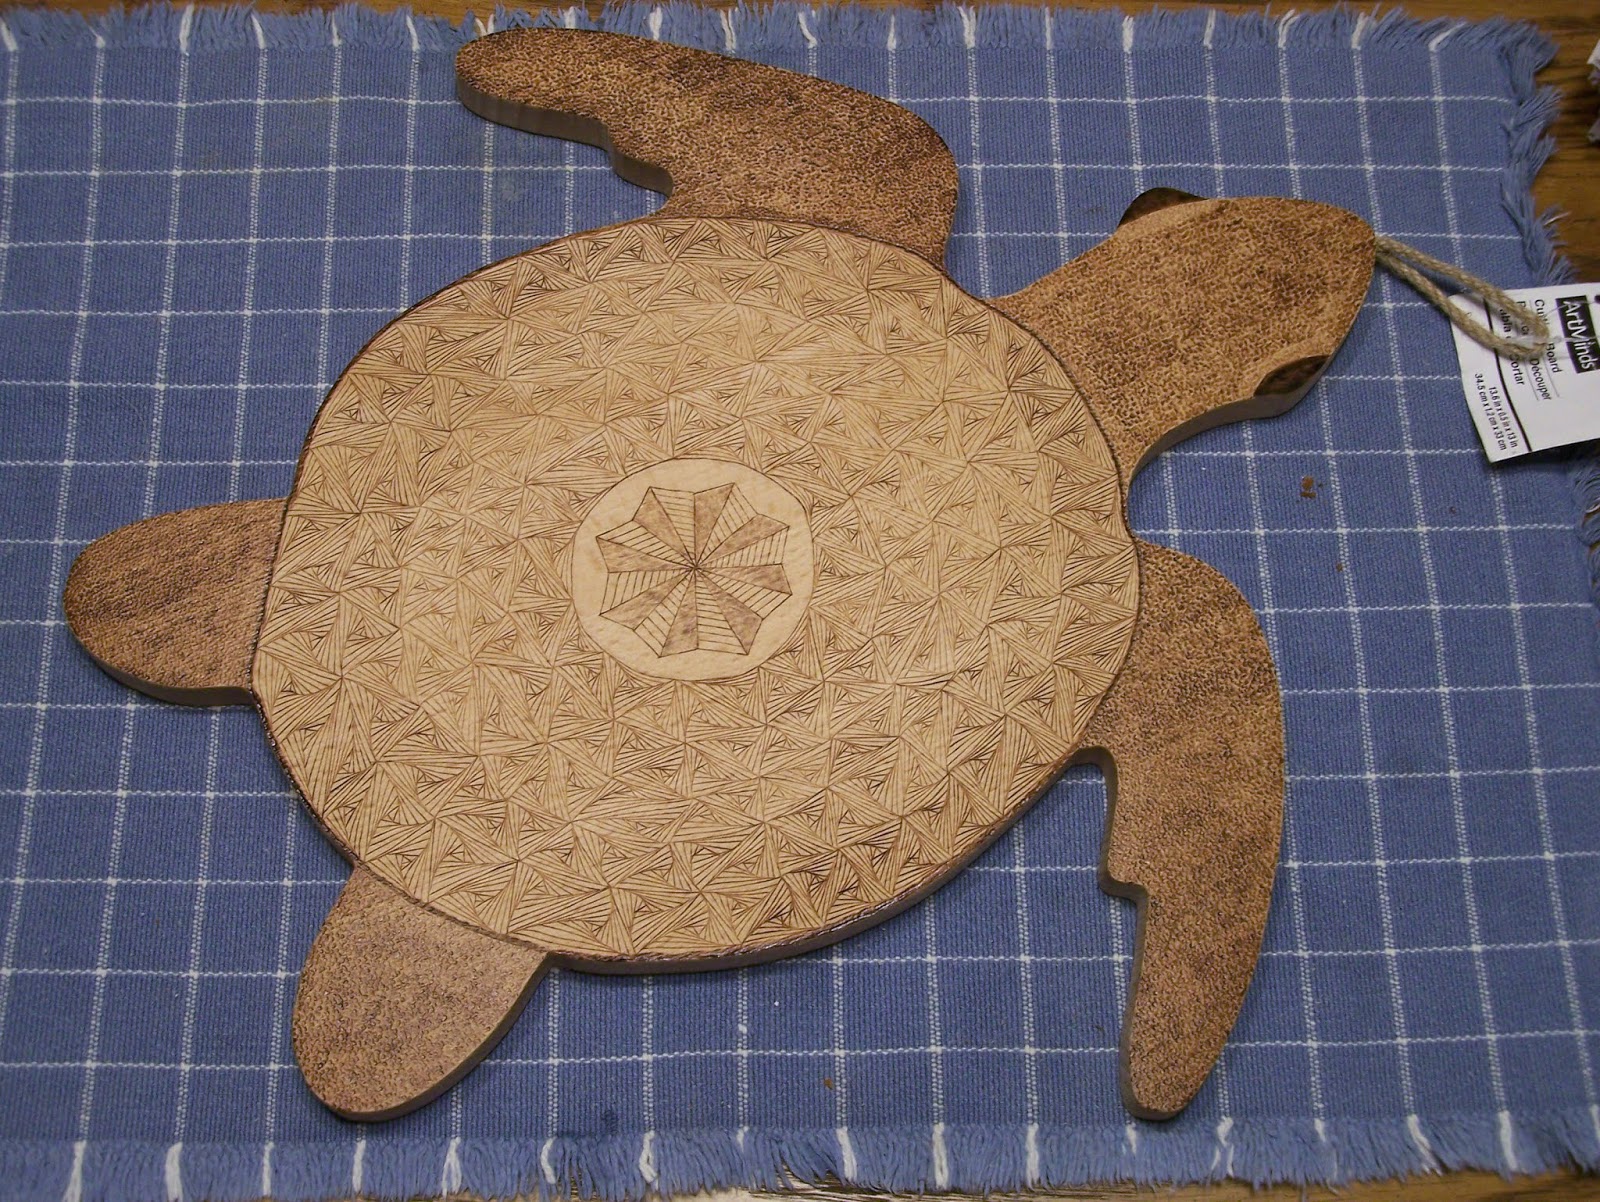
Adventures in Pyrography: Tangled Turtle Cutting board

Have been working on this for some time and was finally able to finish it.  It sat idle for a long time as was working on completing a few other projects.  The tangles that I used also took a while to do. Bought the cutting board from Michael's a while back.  Some of you may have seen the cow that did earlier.  Used a Razertip  D-10 burner with medium fixed regular skew for the line work. The tipple and border outline was done with a 2.3 mm stylus ball and the shading in Gneiss was done with a triangular shader.

Here is the finished project. Sorry I did not take lot of pictures of the proceess.  Took this one early on so you can see what I started with.


Here is the way it ended.


Tangles used: Gneiss, Paradox, Tipple

Thanks for visiting.  As always, comments are welcomed, encouraged, and appreciated.

Go Tamgle !!

Sunday, September 30, 2018

Dual Challenge: Diva Challenge #369 - Orb-tastic & Anything Goes - Tangled Art for Everyone - Ode to Crescent Moon

Not sure that I will get this done ion tome to post in the Diva Challenge.   I wanted to do this mostly because I needed to do something that was more repetitive and for me relaxing. I did accomplish this but it took longer than what I expected. I use Tipple a lot but not so much Crescent Moon.  What I did on this was to think of different ways that I could use Crescent Moon.  Are probably more, but I got at least four done.  I used Tipple in the one version in a way that I usually do with Crescent Moon.  I tried to not be so exact with the orbs and even did some "under work" rather than each one having to be a complete orb.  As is fairly common, the shading of this was one of the bigger challenges.  Here is what I come up with.  I hope you enjoy it.


Used 01 Micron and 2H and 4B pencil for shading.

I have not had time to look at what others have done with this challenge.  If you have not either, click on this link and see some interesting uses of orbs.


Thanks for visiting.  As always, comments are welcomed, enccouraged, and appreciated.

Go Tangle !!

Saturday, July 28, 2018

Alcohol ink wash for a background.

This was a class that I did some time ago that I finally finished the piece.  The class was on different backgrounds so was not as much about the tangles. The process is to wet the paper, and then put the ink on the page.  Then the fun begins.  You then just let the ink run over the page, turning it to spread it on the page in a random fashion.  I don't have a picture of what it looked like before I started tangling but here is what I think is the finished piece.


Most of the tangles are from Zentangle®.  The ones that are not are Birds on a Wire, Wist, Phicops,Fassett, Featherfall and Joy.  I am pretty sure that all of these are on Tangle Patterns.  

Am trying to decide about getting it framed.  That is always a challenge for me.  This is an 8.5 x 11 piece of paper.  

Thanks for visiting.  As always comments are welcomed, encouraged, and appreciated.  

Go Tangle !!!

Friday, July 27, 2018

Beyond the Basics class: Tangled 3-D House

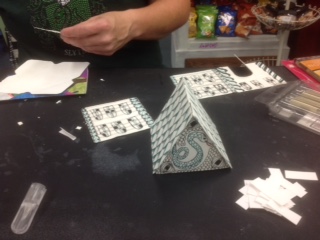
Just completed a class using Dorian Eng's tangled houses concept.  Was a fun enjoyable class.  Was a challenge getting them together but learned a few things that I will use if I do the class again.  Here are pictures of the different pieces to the house.


Only a picture of the gable that is in the front of the house.  The back is similar except  there are no flowers and I did the tangle Gneiss where the window is on this one.


Here are the tiles for the roof.  I used the tangle Shing.  


Here are the front and back.  The front is on the left.


These are the two sides.  


Here are pictures of the house put together.  


The one on the right is one of the student's houses.  This is the front.  I took a series of all sides.  Here they are.


One student had the tangling done but did not get it all constructed. She is a big Harry Potter fan.  She did a Slithering theme.  Here is the picture I took of what she had done in the class.


She sent me a picture of the finished house after class. She has Harry Potter lego figures in front and used an electric candle for the lighting.


Here are pictures that she sent me after she had completed it.


You can see the lego figures better in this picture.


She added tissue paper behind the window cut-outs for an additional "green glow".  Said she was looking for a darker green and may put that in it.


If you are interested in classes, click on my class tab on the banner on the top of my home page. There is information about scheduled classes there.  If have other questions, you can email me.


Thanks for visiting.  As always, comments are welcomed, encouraged, and appreciated.

Go Tangle !!

Saturday, July 21, 2018

Completed cutting board: Burned tangled cow

After 20+ hours I finally finished the cutting board.  Most of the time was spent doing the shading/burning.  Did not realize would take that long.  Probably could have made the striping a little bigger.  That would have cut down on the number that I needed to shade.  Here are the pictures as it progressed.


I am not going to repost all the pictures from the original post but this is what it looked like in the begining. 


Here is the next step of tangling the hooves and creating the legs. Used the tangle Paradox for the hooves.  Only one more step but it was a large one. 


And here is the finished cutting board.  Thought about adding a bell to the collar but opted not to add this.  I am still a "newbie" when it comes to pyrography.   I still have a lot to learn. I could have spend a little more time preparing the wood. I thought I had it pretty smooth, but as was burning, there were a few rough spots.  Think it lead to some feathering, or over burns.  This was also probably due to not having the heat setting quite right. Have the same problem with water colors.  Get impatient.  Try to do things too quickly.  


Tangles used in this are: Tail-Shattuck: Horns-Fassett; Collar-Hybrid variation; Hooves-Paradox; Spot-Striping.  The end of the tail is just line work.  


Thanks for visiting.  As always, comments are welcomed, encouraged, and greatly appreciated.

Go Tangle !!  


Sunday, July 15, 2018

Another pyrography project: Cutting board - Cow shaped

Now that I finished the wood cuff, have moved on to the next project.  I bought a couple of wood forms at Michael's a while ago. One is shaped like a turtle and the other is shaped like a cow.  Not sure why I chose to do the cow first.  Maybe is was because I did not know what I wanted to do on the turtle.  Of course I did not have a clear idea of what I wanted to do with the cow either.  This will be combination of tangles and just some shading.  Have a lot to do yet but here is what I have so far.


Wanted to take a picture of the blank form.  Almost forgot as I started on the tail a little  before I took the picture. 


I started with the tail.  The bottom is just line work and the tail uses the tangle Shattuck


Next I moved up to the ears and horn.  I used Fassett for he horns and some shading for the ears.


This was the hardest section so far.  Most is just shading and making it as dark as I could.  Had to go over it a lot.  The nose was not too hard to do.  The real problem was with the eyes.  I usually do not try to pencil in something but I had to with the eyes.  Tried a couple of things before I finally settled on this style.  I looked at a lot of pictures and tried a couple of different things.  This is the only thing that looked half way decent.  Made me realize why I do not like doing realistic art.  The collar is probably a little too high on the bottom but since I burned it, it has to stay.  Maybe will add something to it.


Will probably work on the feet next.  Have an idea of what I want to do on this. Then will work on the body.  Will probably be a lot of negative space.  Not sure how often I will post the progress on this.  May just do a series  to the end.  

Thanks for visiting.  As always, comments are welcomed, encouraged, and appreciated.

Go Tangle !! 


Friday, July 13, 2018

Tangled Wood Cuff: shaded and polished

Finally finished the shading on the wood cuff that I was working on.  It is difficult to get a picture of the whole thing.  I used the burner for the shading.  It is a triangular shaped nib that is for shading.  I used the edge of it for the darker outline.  The first picture is the wood cuff after all the shading was done.


Here is the cuff after I put the beeswax wood polish on it.


It took some time to do the shading.  Would probably try some different things if I did it again.  But I am pleased with the way that it turned out.


Thanks for visiting.   As always, comments are welcomed, encouraged, and appreciated.

Go Tangle !!

Tuesday, July 10, 2018

Update on the tangled cuff

Brief post just to show the progress so far. Decided to do the shading with the burner.  This is what I have so far, which is about ¼ of the cuff.  Takes a little time as will put down a little shading, then outline it, and then finish the shading.  The wood does get warm. Only slipped off the wood one time when I was working on the edge and caught my finger.  The first picture is from the original post and the second is with the shading that I have done so far.  Will post again when is completed.


Thanks for visiting.  As always, comments are welcomed, encouraged, and appreciated.

Go Tangle !!